INTAKE-AIR SYSTEM REMOVAL/INSTALLATION [ZJ, Z6]
- • A hot engine and intake air system can cause severe burns. Turn off the engine and wait until they are cool before removing the intake air system.
- • Fuel line spills and leakage from the pressurized fuel system are dangerous. Fuel can ignite and cause serious injury or death and damage. Fuel can also irritate skin and eyes. To prevent this, always complete the "Fuel Line Safety Procedure". (See BEFORE SERVICE PRECAUTION [ZJ, Z6, LF].)
- • The PCM is built into the air cleaner cover. Applying excessive pressure to the cover could damage the PCM. Be careful not to put your hands on the PCM during the removal/installation.
- • Removing the PCM from the air cleaner could damage the sealing or the circuitry. Do not remove the PCM from the air cleaner.
European (L.H.D.) Specs.
1. Remove the battery cover. (See BATTERY REMOVAL/INSTALLATION [ZJ, Z6].)
2. Disconnect the negative battery cable.
3. Remove the under cover.
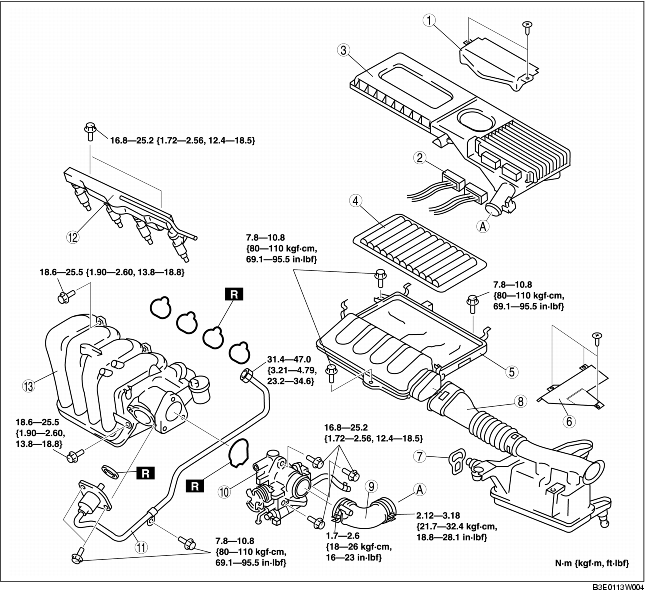
4. Remove in the order indicated in the table.
5. Install in the reverse order of removal.
6. Complete the "AFTER SERVICE PRECAUTION". (See AFTER SERVICE PRECAUTION [ZJ, Z6, LF].)
|
1
|
PCM connector cover
|
|
2
|
PCM connector
|
|
3
|
Air cleaner cover
|
|
4
|
Air cleaner element
|
|
5
|
Air cleaner case
|
|
6
|
Fresh-air duct cover
|
|
7
|
Strap
(See Strap Installation Note.)
|
|
8
|
Fresh-air duct
|
|
9
|
Air hose
(See Air Hose Installation Note.)
|
|
10
|
Throttle body
(See Throttle Body Removal Note.)
|
|
11
|
EGR pipe (Intake manifold side)
(See EGR Pipe Installation Note.)
|
|
12
|
Fuel distributor
|
|
13
|
Intake manifold
(See Intake Manifold Removal Note.)
|
U.K. Specs.
1. Remove the battery cover. (See BATTERY REMOVAL/INSTALLATION [ZJ, Z6].)
2. Disconnect the negative battery cable.
3. Remove the under cover.
- • New set bolts are required when reinstalling the PCM connector cover. Perform Step 4 only when removing the air cleaner cover.
4. When removing the air cleaner cover, perform the following procedure and go to Step 6.
- (1) Remove the PCM connector cover. (See PCM REMOVAL/INSTALLATION [ZJ, Z6].)
- (2) Disconnect the PCM connector. (See PCM Connector Installation Note)
- (3) Remove the air cleaner cover.
5. Set the air cleaner out of the way.
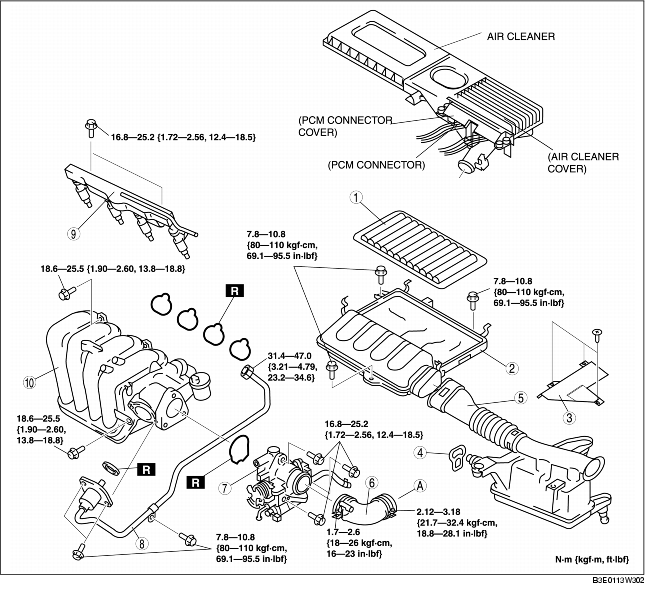
6. Remove in the order indicated in the table.
7. Install in the reverse order of removal.
8. Complete the "AFTER SERVICE PRECAUTION". (See AFTER SERVICE PRECAUTION [ZJ, Z6, LF].)
|
1
|
Air cleaner element
|
|
2
|
Air cleaner case
|
|
3
|
Fresh-air duct cover
|
|
4
|
Strap
(See Strap Installation Note.)
|
|
5
|
Fresh-air duct
|
|
6
|
Air hose
(See Air Hose Installation Note.)
|
|
7
|
Throttle body
(See Throttle Body Removal Note.)
|
|
8
|
EGR pipe (Intake manifold side)
(See EGR Pipe Installation Note.)
|
|
9
|
Fuel distributor
|
|
10
|
Intake manifold
(See Intake Manifold Removal Note.)
|
Throttle Body Removal Note
1. Remove the purge solenoid valve. (See PURGE SOLENOID VALVE REMOVAL/INSTALLATION [ZJ, Z6].)
2. Drain the engine coolant. (See ENGINE COOLANT REPLACEMENT [ZJ, Z6, LF].)
Intake Manifold Removal Note
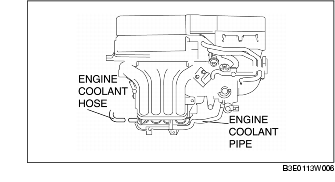
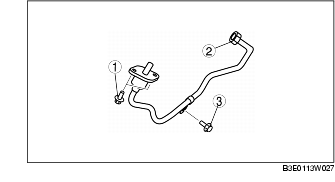
1. Disconnect the engine coolant hose from the engine coolant pipe as shown in the figure.
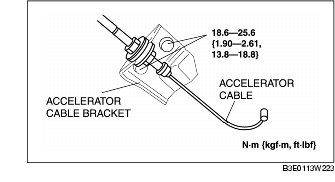
2. Remove the accelerator cable bracket from the intake manifold.
EGR Pipe Installation Note
1. Install the EGR pipe installation bolts and the nut in the order indicated in the table.
Air Hose Installation Note
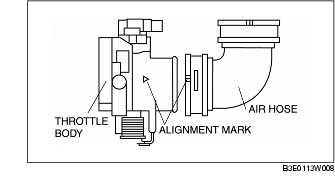
1. Align the alignment marks on the throttle body and the air hose.
Fresh-air Duct Installation Note
- • Before installing the fresh-air duct, verify that the rubber mounts on the battery support bracket have not fallen off.
- • When inserting the fresh-air duct into the rubber mounts, applying soapy water aids the operation.
1. Verify that two rubber mounts are installed on the battery support bracket.
2. Install the fresh-air duct into the rubber mounts.
Strap Installation Note
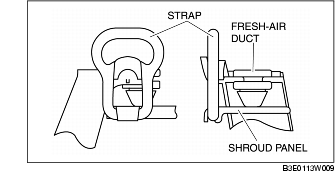
1. Using the strap, secure the shroud panel and the fresh-air duct as shown in the figure.
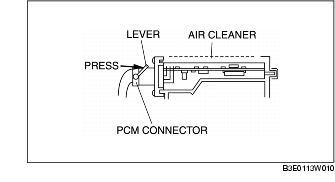
PCM Connector Installation Note
1. Insert the PCM connector fully into the air cleaner and push the lever until a click is heard.